SFX
Special effects is a vast topic. However, it is an exciting area with huge potential for low budget filmmakers and schools groups. There are often effects built in to editing software.
Speed change
Speeding up, slowing down or reversing your clip. A speed change is not just for fun, it can help extend a shot that is too short, speed up a leisurely pan and used with skill can even rescue some performances. It can also be highly effective in bringing attention to something. Watch how it is used in films such as Martin Scorsese’s Raging Bull.
Superimpose
This is a bit like a dissolve where two or more shots mixed with each other for longer than just a transition. It’s often used when you want to show actions happening at the same time in different locations.
Split-screen or multi-screen
This is a bit like superimpose but you have clear framed action rather than mixing the images. Split Screen is two images, like seeing both sides of a telephone conversation. Multi-screen is more than two images.
Colour effects
Contrast, colour balance, old movie effect, etc - change the look of a clip and can be applied to the whole film as a style, or to a sequence that is meant to stand out from the others (eg a flashback in black and white). They are also used to match clips where the colour or contrast is distractingly different.
Try them out - you probably won't use many of them - and they should be used only if there's a good reason, but it's good to know what is available.
Colour grading and changing brightness can help shots match each other.
Reframing in the edit can tidy up an awkward framing. Although there is a limit to how much you can zoom-in before you notice degradation of the image.
In-camera effects
We usually think of special effects being created 'in post production' with computers, however a number of exciting things can be done 'in camera'. Carefully planned speed changes or reverse footage can provide quirky effects; as can puppetry or animation mixed into a live action film. They have stood the test of time - so don't rule them out. A few examples to get you thinking:
Reverse
An object lying on the floor magically snaps up into the palm of a hand
Editing
An empty room : fast cut to - same room, same lighting a huge puff of smoke : fast dissolve through to - someone has appeared in the room.
Puppetry
A hat mysteriously floats off someone's head, a chair slides over and blocks a door
Animation
A computer mouse moves of its own accord; the computer screen turns and looks at someone.
Compositing
Compositing is putting together different layers of film to create a desired effect. Once you understand the basics it can help you create great effects quite simply. You create different sequences of film, usually in precisely the same place, at the same time, with a locked off camera. And then use masks or mattes in the edit suite to hide or reveal elements of your image.
Again, this is best explained with examples:
Invisible door
Character walks across screen, but disappears as she passes a certain point.
How? - Film someone walking across the room, and then film an equal length of the same shot with nothing happening. In post, split the screen in half and make one side of the screen the action of the character walking, and the other side the empty room.
Trapped in a cage
One of the simplest things you can do is place new cutout elements in the foreground, literally cutting out a still image and laying it over your moving action.
Example: In cutout animation, you want your characters to appear trapped behind bars. In the old days you had to lift the cage off and place it back down for every single frame. Now you put the cage in afterwards - so the animation of the trapped figures can happen easily without the bars getting in the way.
In advanced programs, this can often be a layer with no background created in Photoshop.
Losing the puppeteer
You have a perfectly composed shot but the hands of the puppeteer keep getting into the shot : find a frame at the start or the end where there is no movement : and use this still to mask over where the hands appear.
Successful effects take planning - allow lots of extra time, but don't be put off.
The good compositing guide
- Watch out for shadows
- Don't touch the tripod during or between takes
- Avoid situations where the light is changing (ie windy cloudy bright days)
- Film a clean pass: an identically framed shot where nothing happens
Green screen
Also known as: blue screen, chromakey, keying
Sometimes we want to separate an element of our picture and add it or composite it into another picture. In video we call this process keying. Think of a flying carpet in the sky. We would film the carpet on it's own, then cut it out (or key it out) from it's background and finally add it to a shot of moving sky.
Keying is created by filming something against a flat coloured background. Greenscreen software looks for all the pixels of that colour, or near to that colour, and makes them transparent, so you can see your chosen background behind.
Two examples of green screening for education:
Visiting strange places
Film children dressed in appropriate costumes against a keying background talking about a particular place. In the edit, key out the background and put the children against a still image of the place they are talking about.
Racing driver
Film someone acting like they are driving a fast car against a keying background. Take film from a moving car, speed it up and put the two together.
The good keying list
- Create a large area of colour (larger than you might imagine)
- Evenly stretched material or smoothly painted wall..
- Intense colours are best, usually green or blue.
- Make the background colour different from your subject (for a green dinosaur bluescreen might be better)
- The further away the background is from your subject, the better (two metres or more, otherwise reflected green light bounces onto your subject, and shadows fall on your background)
- Use a lot of even light.
- Sharply defined bright colour not washed out video.
- If you can, backlight your subject as this helps separation.
- Manual focus on your subject.
- Its difficult include peoples legs (storyboard carefully and you won't need them)
If you can't manage all the above, do as many as you can, then run a test and see if it works for your sequence.
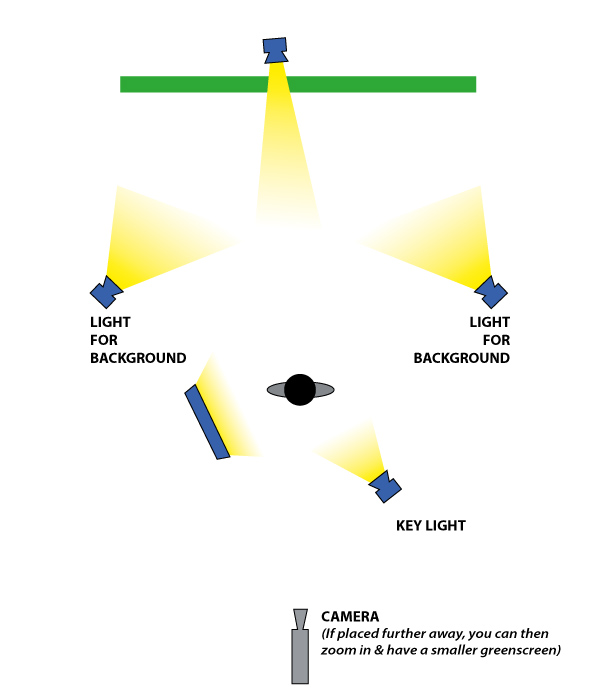
This is the ideal - less lights can work
Green screen before anything is removed
The green screen has now been keyed out (and the remaining bits of the studio you could see behind have been masked off)
The graphics to go behind the action
The two clips 'composited' together to make one
The shot now in sequence with a few other shots as it appeared in the short film 'Bad Conscience' created by young people at the DCA in Dundee