Cutout
Cut-out animation is one of the quickest and easiest ways of creating animation and is suitable for children as young as three.
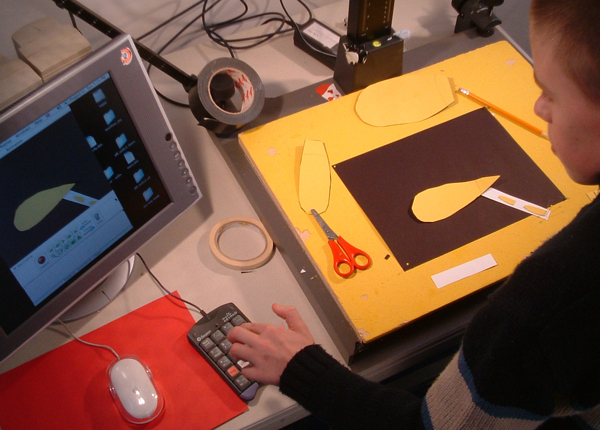
With a camera fixed directly above your work, items of 'flat' artwork are moved a bit at a time, and after each movement, a frame is taken.
Unless you have lots of devices, students might have to queue, nevertheless artwork can be accurately prepared away from the camera and stored easily.
Ensure each background is a good fit under the camera, and is prepared on a rigid piece of card, wood, or pinboard.
With large backgrounds, getting the camera high enough to fit everything in can be a challenge, and children may need to work on the floor.
Backgrounds and foreground artwork
Be clear which elements are static and what might move.
Items that are definitely static could be fixed: hills, buildings, sky. However, young people often glue a crucial prop near an edge, if needed in the narrative this can cause problems, oversized backgrounds are best.
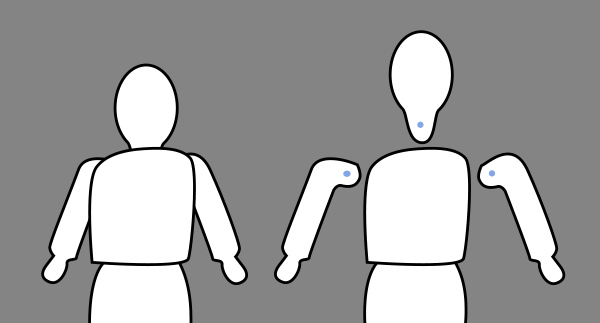
Also, a door might want to open, windmill blades rotate and of course characters want to move; so these must not be stuck down! Ideally fix with BluTack, then items can be repositioned.
Characters
Most children can create characters for cut-out. The two main ways of creating figures are:
- Fix together different pieces of material to form characters
- Paint characters that are then cut out
Whichever method you use, the moving limbs are the bits that need the most care; they need to be cut longer so they can be fixed behind the body with small pieces of blu-tack.
200-250gsm card is ideal as even children can still cut it themselves, but it is stiff enough to paint and a character will survive appearing in numerous scenes. If painted figures are cut out by an adult, children as young as three can create beautiful animation with their own original artwork!
Mistakes
If something major goes wrong in your animation it is sometimes difficult to correct . If you have only just started, the best thing is usually to start again; if you are halfway through it's a more tricky decision.
Usually carry on, and then at the end, film a close up shot on a particular detail within the main scene; which you can edit in later.
Close-ups and cut-aways are great for adding dynamics to your film, and are useful to focus on a particular part of a complex scene.
Floating clouds & swaying trees
Although young people often create clouds and branches to animate, they rarely work well. This is because it is difficult to create smooth slow movements, but the main problem is remembering to animate them every go - especially if you have seven dancing bears in the foreground!
If they are essential to the story, assign one animator to each tree or pair of clouds, otherwise stick them down.
With clouds, remember to occasionally bring new ones in, or you start with a sky full of clouds and end up with it empty
Other under-the-camera techniques
Cut-out animation implies you only use things cut out of card; and although this is great there are numerous other things you can do:
Object animation
Almost anything can be put under the camera and animated - sand, paint, clothes, jewellery, ice, found objects, foliage etc. Natural materials are particularly good.
Silhouette animation
This is usually created using a light-box, or other back-lit system such as: a clear surface, with a layer of tracing paper and soft LED lights behind. The size of the light-box will determine the scale of your scene.
Silhouette animation can incorporate transparent materials such as tracing paper, tissue paper, thin layers or salt or sand.
Animation can be monochrome, creating greys through layers of tracing paper or grey tissue paper, with black card for characters. Colour can be created using tissue paper and coloured gel.
Sand
Sand or salt (which can be dyed with food colouring) can be manipulated with the fingers or brushes to create fluid images.
Photomontage
Another immediate way of creating work, is by cutting out photos and images to animate. Photos can be especially created for the project so children in the group are animated within their film. Or you can create a narrative around images found in magazines. You may end up with Lady Gaga dancing cheek to cheek with Nelson Mandela on a Matisse backdrop, but that can't be all bad.
Mixing it
The exciting thing about working under the camera is you can mix media in a multitude of ways. Objects can float over photographs, paint can explode across a collage, drawings can be mixed in with the pixillated hand of a child.